
Steinberg Wavelab
9 September 2013
Recording, editing and mastering software.
Text:/ Graeme Hague
teinberg’s Wavelab software is often overlooked when you’re considering day-to-day recording and editing tasks. That’s because Wavelab is mostly thought of as a mastering application, for applying the final touches – the last bit of spit and polish after all the real work has been done. Wavelab certainly isn’t only about mastering and has a lot more to offer than you might realise when it comes to cutting and squashing your AV audio during the creative phase – and it can achieve results with much greater precision than a digital audio workstation (DAW). Wavelab is really an audio recording and editing application (rather than recording and arranging like its sibling Cubase) and, for sure, it has a heap of mastering effects and tools, but it’s those strong editing features that will help you crunch all your disparate audio files into a more cohesive whole than a DAW might do.
Therein lays one of the problems with many AV projects like film documentaries, training videos and sales presentations. A lot of the various audio tracks come from a wide range of sources and not just the comfortable, controlled environment of a recording studio. You’ll need dedicated audio tools to chop files up, stretch them and remove noise, hiss, clunking and clicking… and finally create continuity in tone and volume that unfortunately the audience will take for granted – never mind, we know what you’ve been doing.
The latest incarnation of the program, Wavelab 8, gives you all these tools and more. However, will you survive the learning curve?
FIRST IMPRESSIONS
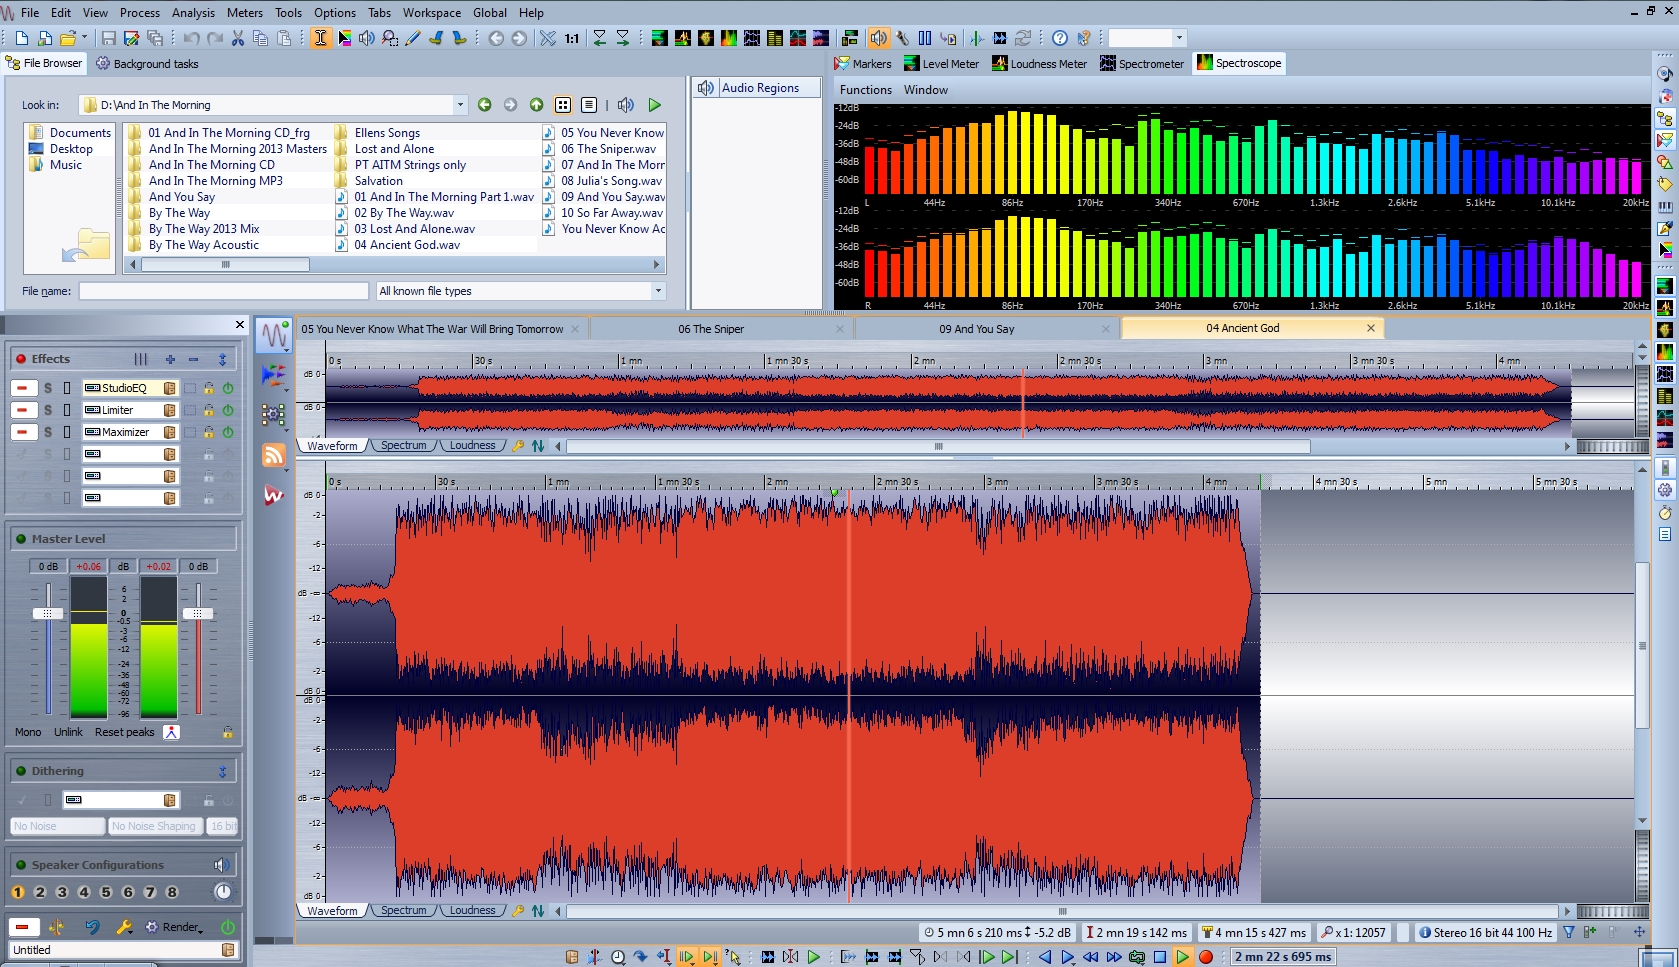
That learning curve is pretty steep even for an old DAW hand like yours truly, but everything starts to fall into place quickly once you understand the basics. Wavelab is crammed with features and functions, and to put most of them at your fingertips the GUI is surrounded by unhappily small icons (my screen resolution is 1680 x 1050) that will mean little to you for a while. Fortunately, Wavelab supports a Tooltips system and hovering your mouse over anything prompts a text-box explanation. Typically, you’ll start opening and playing files, and experimenting with the different views and metering, which will keep you amused for a while… okay, stop fooling around, you need to get serious about figuring out what the hell is going on.

FILES & MONTAGES
There are two methods of working with Wavelab. You can open an individual file in an Edit window to begin editing and manipulating it to an nth degree or you can open multiple files to create a Montage, then edit those files within the Montage framework. A Montage can be the basis of something like a CD compilation, or an extended dialogue track made from dozens of takes, a VO track – anything that requires pulling a collection of files together or any regular workflow that will benefit from having an overall template. The Edit window can save Workspaces, Templates and individual presets in the plug-ins, but it doesn’t really lend itself to applying your favourite setups, such as plug-in chains, across different files in the same session. So creating a Montage for frequent tasks and dropping files in and out as required is a good idea. For example you might start a ‘Voice Over’ Montage for regular work on VO tasks, even if you’ll never produce the entire Montage as one specific project.
EDITING CHOP SHOP
The Editing window is the audio chop shop where you can fine-tune the individual files in preparation for your Montage. Here you can make up for any recording’s short-comings with precision tools like Gain, Normalise, Loudness Normaliser and many more, including a Pitch Quantize, which is Wavelab’s pitch correction plug-in. These are all plug-ins we’ve seen for years and nothing especially unique in what they do, except that Wavelab takes the parameters of these a number of steps further to provide more accurate and predictable results. For instance, often you’ll have options to reference the entire file when you’re trying to fix only a section to avoid disjointed moments of audio. In the Edit window you find all the standard Split, Delete and Time or Pitch shifting functions to wrangle an audio file into the right shape. Again, these are way more detailed in application than you’ll find in many DAWs.

If you want to apply effects and processing such as reverb, compression and the like – the usual suspects – in the Edit window you’ll need to use the Master Section where plug-in slots allow this as a chain. This is where you’ll discover that starting a Montage might have been a better idea (yes, all right – it happened to me), because while you can open multiple files inside the Edit GUI and switch between them, the signal for all of them will be routed through the Master Section and trying to swap your plug-ins’ setting in that Master Section to suit different files just gets too tricky. By the way, the Master Section is also the only place in the Edit window you can apply the onboard Sonnox Noise Reduction, De-Buzzer and De-Clicker plug-ins. These aren’t available under the Process menu.
The ultimate aim is to render your edited file into a new, clean version for inclusion in a Montage. However, you do get a second chance for re-opening files in the editor from the Montage window, if needs be.
THE BIGGER PICTURE
The Montage window is just as crowded and festooned with icons and you’ll need to look closely to find what you want. You can customise these views, but initially you won’t know exactly what’s needed and what isn’t. The big difference in Montage mode is that individual clips or files can have their own plug-in chains by assigning them to separate tracks. By employing tracks rather than using individual plug-in chains for each clip (which is still an option) you don’t have unnecessary duplication. For example, dozens of voice-over clips recorded in the studio during the same session can share a track and plug-in chain, while an OB voice-over might be given a separate track to allow for noise reduction.
By now Wavelab is probably starting to sound suspiciously like a DAW, but again the emphasis is more on precision and accuracy. Mixing material like dialogue and voice-overs into a seamless presentation requires the extra edge that dedicated audio editors like Wavelab provide.
METERING MATTERS
A strong suit for Wavelab is its metering capabilities. There’s a Level Meter, Loudness Meter, Spectrometer, Bit Meter, in fact, metering scopes of all persuasions… just about every means of visually inspecting audio is included. If you haven’t been an aficionado of metering before and just avoided the nasty, red bits at the top, Wavelab’s metering might change your mind. The large displays with clear and detailed information encourage you to indulge in a little finesse when you’re using EQ and compressors. The interaction between different plug-ins and their order in the signal chain becomes more obvious. Very soon you’ll learn to appreciate what all that metering fuss has been about and to squeeze every last bit and sample into place. Seeing audio properly for the first time can be quite the revelation.

NEW TRICKS
Wavelab 8 has been released with more than a few new features including a Speaker Configuration facility that lets you set up different outputs to suit a variety of monitoring situations. Also of special note are three new plug-ins. The Tube Compressor can add some audio colour and character. A Brickwall Limiter can be a final, handy bastion, ensuring all your hard work won’t inadvertently clip in the red. And the Voxengo Curve EQ has, aside from the expected EQ facilities, a Spectrum Match feature that in theory will allow you to imprint the tonal characteristics of one track onto another. It’s not an exact science, because it’s dependent to some extent on the complexity of the audio you’re trying to EQ, but in many instances it can come darn close.
DEVIL IN THE DATA DETAIL
This may be a blatantly obvious thing to say, but when you’re using a program like Wavelab you’ll need very good monitoring, very good hearing, and at least a pretty good idea of what you’re hoping to hear. The alternative is owning crap speakers, you’ve listened to far too much thrash metal music, and you’re hoping that Wavelab will magically do the job for you anyway thanks to clever presets and one-button-fixes-everything plug-ins. Sorry if you’re in the latter category, but Wavelab is not software for novices to achieve mastering studio-like results without having a clue what they’re doing.
To be fair, a lot of what Wavelab does can be accomplished in a top-notch DAW like ProTools, Logic, Sonar, Studio One or, of course, Steinberg’s Cubase 7. No one’s arguing those DAWs haven’t come a long way. Also, Wavelab has no mixer window and a lot of the more esoteric plug-ins like amp simulators aren’t there (unless Wavelab recognises third-party plugs you have installed).
Wavelab allows you to approach that mixing task from a different, more calculating perspective. It’s when your sound editing requires a scalpel rather than a sharp knife — Wavelab will let you deal with the finer details a lot better.
It’s a different workflow and mindset, but it gets great results – and it will let you do that final mastering spit and polish, too


RESPONSES