
Practicalities of Lighting Design For TV
Translating your lighting design skills into the world of video.
27 April 2011
Text:\ Paul Collison
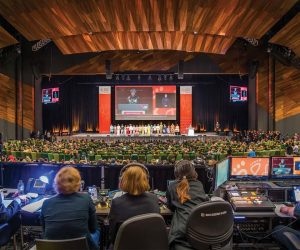
X-Factor images by Mark Bedson
So you’ve read last month’s article on lighting 101. You are now in demand all over town, doing shows every second day. Life is good. That’s all about to change when a producer you know calls and asks you to light another show. “that sounds easy” you think to yourself as you begin to plan the show in your head before the conversation is finished. However the last three words from the producer send a chill down your spine and have you in a cold sweat for days. “Oh by the way” the producer says, “it’s for television”.
Official disclaimer: there are literally dozens, if not hundreds, of approaches to lighting for camera. Every Lighting Director (Lighting Designer in TV talk) has a different approach. The most important thing is the end result. The following is a way, not the only way, to light for a camera. The second part of this disclaimer is about the content. One cannot explain the intricacies of lighting for camera in 1500 words. If it could be done, anyone would be able to light for television. This article is but a taste of the number of things a television lighting director has to think about when lighting for camera.
If you’ve never lit for camera before, it can be quite daunting. If I had a dollar for every time I was told that the camera requires ‘something’ in order to work, I’d be a rich man. Whilst this turn of phrase is somewhat accurate, it is fundamentally flawed. A more accurate view would be that the camera sees the world very differently to the human eye. Simply put, what you see with the eye, is not necessarily what the camera sees.
The human eye is wondrous design. For a start, we can see great variations in light level at the same time. The human eye can see detail in a shadow, whilst at the same time, still seeing other things in direct sunlight. This is something a camera cannot do. A human eye can adjust what we perceive as ‘white’ and see a greater range of the colour spectrum without having to recalibrate. Again, this is something a camera cannot do.
There are some things a camera can do better than us though. The human eye can take up to twelve minutes to totally adjust to a massive shift in light level. Try standing outside next to a white building in the middle of the day and then walking in to an almost pitch black auditorium. It can take a long time for your eyes to adjust. For fun, go the other way. Walk out of a pitch-black cinema into the middle of a bright summer day and feel your retina literally burn from the amount of light. A camera can adjust for these level changes in barely a second, (if the operator is paying attention!)
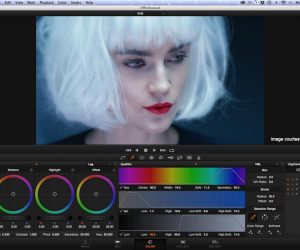
Then there is colour. The human eye can process varied and highly saturated colour variances, whilst retaining clarity and balance. All cameras struggle with large areas of highly saturated colours. Different cameras deal with different colours in various ways. Some are better in the blue range, some reproduce better reds. Knowing how the camera captures what it is seeing, and how the camera sees light differently to the eye, can allow you to use these differences to your advantage. Knowing these differences can also help you get the picture you want to see on to the screen.
WHITE AIN’T WHITE
One of the first things to consider is which colour temperature to use as your reference. Colour temperature is measured in Kelvin (K). A normal tungsten lamp (like the ones that have been removed from the shelves of our lighting stores) burns around 2600K when at full. As you dim the lamp, the colour temperature drops, resulting in a lamp that becomes more orange. A fluorescent lamp, like the 400 million that are in your single local 24-hour convenience store, burns higher at over 5000K. Lamps that burn over 5000K have a lot of light in the blue area of the colour spectrum, compared to lights burning around 3000K. High colour temperatures are referred to as cool light while low colour temperatures are referred to as warm light. Cool and warm here refer to the colour, not the temperature of the lamp measured with a thermometer. Regardless of what type of light you wish to balance to, either of these sources can be made to look normal on camera. When lighting for camera we are able to set what we decide to be ‘white’. So what we are doing at this point, is telling the camera what type of ‘white light’ we wish to be, well, white. In Australia, we refer to this adjustment process as ‘setting the white balance’.
So the question is, “How do I know what colour temperature to balance the camera to?” This is answered most easily by considering the type of light you choose to light your talent with. If you are going to use tungsten profiles and fresnels to light your faces, then you should balance to the colour temperature of those lamps. Otherwise, when it comes time to look at that person on camera, we won’t see a true representation of what they look like on screen. It is that simple… until you realise that balancing to one colour temperature will dramatically affect the representation of other lighting fixtures at different colour temperatures in your shots.
So your moving lights in the background will now appear to be more blue if you’ve balanced to tungsten. The colour tones of the faces will be nice but you’ll need to adjust your colour palette in the moving lights to get the range of colour you want around your point of focus. Likewise, if you’ve chosen to light your talent with a discharge-powered fixture above 5000K, then you’ll notice that all the tungsten lamps in your shots will appear more orange. Again, knowing how the camera responds to these differences will allow you to carefully craft your pictures in a way that suits your particular project.
The next thing we need to do is place our lighting fixtures to light our faces and people. The simplest formula is the ‘key, kicker and backlight’ method. Very simply put, a key light, lights the front of your object, and is generally placed in line with the camera that will most often shoot said object. Your key light should be at a low enough angle in order to not get shadows from eyebrows, nose etc. Although for a more edgy look you might raise them or take them off axis to get those shadows. It really depends on what type of show you’re lighting. The six o’clock news is no place for mysterious shadows… leave that sort of thing for lighting the set of CSI [Insert City Here].
The backlight can sit steeper than your key lights. These are often a slightly different colour temperature or colour. The back light helps separate your talent from the back drop and give them some more dimension, rather than looking like a cardboard cut-out.
The kicker is your last fixture. It can fill in between the key and backlight and give your object some character. Your kicker can be run at a higher or lower light level than the other fixtures depending on the kind of look you are going for. For an edgy interview with a cool, 20-something, rock band, you might push the kicker higher in level and pull back on the key light to give them a cooler, more mysterious look. For a rock star that is older than your grandparents, you might be looking to give them a softer key and kicker using a frost gel or different fixtures.
SO HOW BRIGHT SHOULD IT BE?
This is the age old question. There used to be a saying before chip cameras, “Keep it bright, white, with plenty of light.” This was the mantra of the video engineering world, when the older-style tube cameras had a very limited light level range, and the early models required an obscene amount of light to get a great picture. Fortunately in this day and age of HD digital chip cameras, with outstanding lenses and technological backbones, we can afford to drop light levels to the other end of the scale, and deal in a broader range of light levels.
You might think that you would start with your talent to get the right level and work from there. It might be smarter to look for other things in your shots to get the relative light level correct first, then light the talent accordingly.
In your shot, you might have a plasma screen or an open window or something that you really can’t control the level of. Maybe it is a projector that is running at full, which needs to be present in the shot. At this point, I’ll expose the cameras to whatever it is that has been decided as the limiting source. Once that has been done, we can then light everything else in the shot relative to the one thing we don’t have control of. In the case of the bright window, this might mean we have to light our talent with huge amounts of light to compete with the sun. In the case of the projection surface, it might mean dropping the light level on the rest of the set to an uncomfortably low level. This is okay, so long as the pictures look great.
RESULTS ARE EVERYTHING
At the end of the day, no matter your approach, it’s important the pictures look great. Sometimes it is the most unconventional methods that produce the results. A lot of television technical directors and vision controllers are willing to work with you to get the best result. Feel free to ask questions, and above all establish a relationship and work as a team with the TD and technical teams. It is only together, that great television can be made.


RESPONSES